Friday, October 31, 2008

Goblins, Ghouls and the KKK?

Wee doggies! This is Halloween in Baker City Oregon! The city blocks off Main Street and all the businesses have candy for the kids. It is safe, you know the people handing out the candy, and it is all over by 6 pm. Here are some pictures from the event..


This picture reminds me of my brother...big, burly guy with the cutest little girl!


It is ok, buddy. You're soul won't get caught in the little black box I am pointing at you.


So I really didn't have a "costume" for Jack. It seemed a little pointless to me because he was going to be in his stroller the whole time with a "blanket" over him. But then I started to feel like a "bad mother" so I used my "false" eyelash adhesive to glue some "eyebrows" to his face. He was supposed to be "Mr. Clean" but then he got grumpy...so we changed his costume to "John McCain".


Hmm I think there is a Halloween costume "appropriate" lesson here. Supposedly, the guy wearing this outfit was Hispanic and he was going for irony. My vote is that this costume, along with an older "Alice" that left no room for wonder in her little outfit, are totally inappropriate for this event. Am I wrong here?

Excuse Me, Are You Going To Eat Them?


Happy Halloween everyone!!

For those of you that do not know, I am a scary movie connoisseur. Zombies are my weakness followed by vampires, then weird mutant things. I tend to not like slasher films due to the fact that they are so predictable and the girls poor running form. Since today is Halloween, I thought I should share my list of horrific delights with all of you!

Some of these are classics while others were just plain scary! These are definitely the must-sees:
Night of the Living Dead (the 1968 version)
The Descent
The Exorcist (the part where she runs down the stairs upside down is freaky)
28 Days Later (the first really scary-there-is-no-way-I-could-out-run-those-mothers zombie movie..the ending was a little dreary, but overall, still worth it)
Shaun of the Dead (funny, funny, funny)
Dawn of the Dead (the remake...fast zombies are scary! Plus a baby zombie birth? I am there!)
Evil Dead 2
Alien and Aliens (sci-fi can be scary too)
Jeepers Creepers (c'mon...this has the MAC guy in it)


These next ones are on my list of want to see:
Raw Meat
Reeker (how can this be bad?)
Pulse (the Japanese version NOT the one with Mandy Moore)
Habit
The Wisdom of Crocodiles
Let the Right One in
Jaws 5 (hopefully better then 2 and 4...umm I kinda' like 3..you know..with the dolphins and Dennis Quaid)
Dead Meat (this looks absolutely awful...a must see by Peter Jackson...yes, Lord of the Rings guy)
I, Zombie (like the fly but with a zombie...how can that be bad?)

Lastly, because you will all be out and about tonight, I leave you with this little video to help ensure your safety and avoid any "complications".

Wednesday, October 29, 2008

October Daring Bakers Challenge: Toss the Dough!


It is official! I am now a Daring Baker! For my first challenge, I had to make pizza dough. Easy enough right? Oh wait, did I fail to mention that I was supposed to toss it? As in real pizzeria tossing?

To get myself ready for this challenge, I did a little some research into the world of pizza tossing. Oh yes my friends, their is such a world. I came across these guys first...you have got to be joking. I don't know what is crazier: that there are pizza tossing championships...or that these guys toss pizza and break-dance at the same time. Obviously, there is no sanitation scoring? "Oh Johnny, you would have been given a 10 but we deducted 5 points for the dog poop bits and long hairs in the dough from the 3 times you dropped it while trying to do a handstand." Hmmm not my style.

Next I found this helpful tidbit of info from a cooking school in Cali. He makes it looks so easy...and then his whole class lovingly passes around the pizza dough. After watching this, I thought I can do this! This will be easy.

I was so very, very, very wrong. As you can see in the following video, I am attempting to toss the dough. The dough, however, has really no intention of being tossed. While I am excited that I can actually get some air on my tosses, my pizzas turned into little delicious rectangles rather than the traditional circle. Thus ending my aspiration of ever competing in the Pizza Tossing Championships.


Although I didn't have any crazy unique topping choice to offer everyone, we did cook the pizzas in our antique wood stove. Bonus points for us!


The boys...eagerly awaiting the fruits of our labor.


Our stove...more than just a heater. Good to know.


~ BASIC PIZZA DOUGH ~
Original recipe taken from “The Bread Baker’s Apprentice” by Peter Reinhart.

Makes 6 pizza crusts (about 9-12 inches/23-30 cm in diameter).

Ingredients:
4 1/2 Cups (20 1/4 ounces/607.5 g) Unbleached high-gluten (%14) bread flour or all purpose flour, chilled
1 3/4 Tsp Salt
1 Tsp Instant yeast
1/4 Cup (2 ounces/60g) Olive oil or vegetable oil (both optional, but it’s better with)
1 3/4 Cups (14 ounces/420g or 420ml) Water, ice cold (40° F/4.5° C)
1 Tb sugar - FOR GF use agave syrup
Semolina/durum flour or cornmeal for dusting

DAY ONE

Method:
1. Mix together the flour, salt and instant yeast in a big bowl (or in the bowl of your stand mixer).
2. Add the oil, sugar and cold water and mix well (with the help of a large wooden spoon or with the paddle attachment, on low speed) in order to form a sticky ball of dough. On a clean surface, knead for about 5-7 minutes, until the dough is smooth and the ingredients are homogeneously distributed. If it is too wet, add a little flour (not too much, though) and if it is too dry add 1 or 2 teaspoons extra water.
NOTE: If you are using an electric mixer, switch to the dough hook and mix on medium speed for the same amount of time.The dough should clear the sides of the bowl but stick to the bottom of the bowl. If the dough is too wet, sprinkle in a little more flour, so that it clears the sides. If, on the contrary, it clears the bottom of the bowl, dribble in a teaspoon or two of cold water.
The finished dough should be springy, elastic, and sticky, not just tacky, and register 50°-55° F/10°-13° C.
3. Flour a work surface or counter. Line a jelly pan with baking paper/parchment. Lightly oil the paper.
4. With the help of a metal or plastic dough scraper, cut the dough into 6 equal pieces (or larger if you want to make larger pizzas).
NOTE: To avoid the dough from sticking to the scraper, dip the scraper into water between cuts.
5. Sprinkle some flour over the dough. Make sure your hands are dry and then flour them. Gently round each piece into a ball.
NOTE: If the dough sticks to your hands, then dip your hands into the flour again.
6. Transfer the dough balls to the lined jelly pan and mist them generously with spray oil. Slip the pan into plastic bag or enclose in plastic food wrap.
7. Put the pan into the refrigerator and let the dough rest overnight or for up to thee days.
NOTE: You can store the dough balls in a zippered freezer bag if you want to save some of the dough for any future baking. In that case, pour some oil (a few tablespoons only) in a medium bowl and dip each dough ball into the oil, so that it is completely covered in oil. Then put each ball into a separate bag. Store the bags in the freezer for no longer than 3 months. The day before you plan to make pizza, remember to transfer the dough balls from the freezer to the refrigerator.

DAY TWO

8. On the day you plan to eat pizza, exactly 2 hours before you make it, remove the desired number of dough balls from the refrigerator. Dust the counter with flour and spray lightly with oil. Place the dough balls on a floured surface and sprinkle them with flour. Dust your hands with flour and delicately press the dough into disks about 1/2 inch/1.3 cm thick and 5 inches/12.7 cm in diameter. Sprinkle with flour and mist with oil. Loosely cover the dough rounds with plastic wrap and then allow to rest for 2 hours.
9. At least 45 minutes before making the pizza, place a baking stone on the lower third of the oven. Preheat the oven as hot as possible (500° F/260° C).
NOTE: If you do not have a baking stone, then use the back of a jelly pan. Do not preheat the pan.
10. Generously sprinkle the back of a jelly pan with semolina/durum flour or cornmeal. Flour your hands (palms, backs and knuckles). Take 1 piece of dough by lifting it with a pastry scraper. Lay the dough across your fists in a very delicate way and carefully stretch it by bouncing it in a circular motion on your hands, and by giving it a little stretch with each bounce. Once the dough has expanded outward, move to a full toss.
NOTE: Make only one pizza at a time.
During the tossing process, if the dough tends to stick to your hands, lay it down on the floured counter and reflour your hands, then continue the tossing and shaping.
In case you would be having trouble tossing the dough or if the dough never wants to expand and always springs back, let it rest for approximately 5-20 minutes in order for the gluten to relax fully,then try again.
You can also resort to using a rolling pin, although it isn’t as effective as the toss method.
11. When the dough has the shape you want (about 9-12 inches/23-30 cm in diameter - for a 6 ounces/180g piece of dough), place it on the back of the jelly pan, making sure there is enough semolina/durum flour or cornmeal to allow it to slide and not stick to the pan.
12. Lightly top it with sweet or savory toppings of your choice.
NOTE: Remember that the best pizzas are topped not too generously. No more than 3 or 4 toppings (including sauce and cheese) are sufficient.
13. Slide the garnished pizza onto the stone in the oven or bake directly on the jelly pan. Close the door and bake for about 5-8 minutes.
NOTE: After 2 minutes baking, take a peek. For an even baking, rotate 180°.
If the top gets done before the bottom, you will need to move the stone or jelly pane to a lower shelf before the next round. On the contrary, if the bottom crisps before the cheese caramelizes, then you will need to raise the stone or jelly.
14. Take the pizza out of the oven and transfer it to a cutting board or your plate. In order to allow the cheese to set a little, wait 3-5 minutes before slicing or serving.

Thanks to Rosa for hosting!

Tuesday, October 28, 2008

Inspiration: Bathrooms

Since we moved into this house, I have been madly collecting images for our bathroom remodel. Until now, I had a huge folder of magazine clippings that was getting pretty overloaded. Then I found Domino Magazine's Deco File. It allows you to "grab" picture off the internet and store them in an online file. It is and extremely helpful tool! Highly recommended! Anyways, on to the goods...

There is an ongoing debate in my head about using large rustic slate tiles


or small historic looking hexagon tile.

Photos courtesy of PointClickHome

I love the idea of a walk-in shower!

Photo courtesy of Remodeling Center


I really like how simple this room is and love the darker trim on a lighter wall.

Photo courtesy of Domino magazine

This sink is awesome! My mother-in-law found it a long time ago and my husband built the vanity.


This is a start! Any comments are appreciated!

Sunday, October 26, 2008

That Is Mrs. Rattle-Can Queen to You

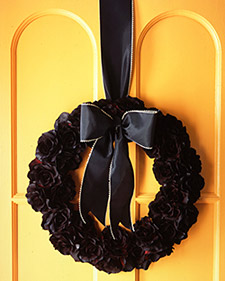
Sooooo my next Halloween decor project was a little more time consuming then planned. I got the idea for this wreath from Martha (yes, I still visit her site even though she dissed me). Her wreath called for silk roses and floral paint...umm expensive. I settled on plastic roses and my handy-dandy black high gloss spray paint. This is Martha's wreath...


And this is my wreath!

It actually came out pretty cute...in a dark and Gothic way. The ribbon is black but for some reason keeps coming out chocolate colored in the pics. I like the bow off to the side...cause I am cool like that. Ok not really...it wasn't big enough for the top and plus, I really do think it looks kinda' cool on the side.

This is a really easy wreath to make. If you want Martha's here are the instructions. If you feel like doing it on the cheap, here is my plan:
Materials:
about 5 bunches of dollar store red roses
14" floral foam wreath (also a dollar store purchase)
1/2 yard 2" black ribbon
glue gun
black spray paint (a.k.a. rattle can...shout-out to LRobb for the new terminology!)
wire cutting pliers


Snip the roses off the flower stems and put into a big pile. Hint: Make sure to mix the flowers up because not all dollar store roses are the same. This will keep your wreath looking balanced. Use your hot glue gun to glue the roses to the foam wreath. Keep them pretty tight so no gaps are peeking through. Spray paint a light coat on the back of the wreath first...covering the lovely green wreath. After it dries to the touch, flip it over and coat the flowers with paint. You can go lighter for a not too dead look or heavier for a morbid and icky but still chic look.

Friday, October 24, 2008

Things To Not Do To A Bathroom


We have finally decided on the first room on the list of rooms to renovate: the master bathroom. I took a moment to really look at our bathroom and pick out the things I liked...and the things we definitely have to get rid of. First, let me show you what I like about this room.

The clawfoot tub is the nicest tub I have ever taken a bath in. It is extremely long (very important for this chica) and is in pretty good shape. I would love to find different "claws" for it and it will need to be repainted on the bottom. Right now it is a soft yellow with gold spray-painted claws.

The next thing I really like about our bathroom is the radiator. It is a hot water radiator so I use it as a towel/clothes warmer while I am in the shower. Unfortunately, while it keeps the room nice and toasty, it is not as aesthetically pleasing as it could be.

Now for the bad. I am going to use this opportunity to educate the masses (or just the readers of this blog) about what not to do in your bathroom.


First, do not EVER, EVER, carpet your bathroom. It is possibly the grossest thing ever due to the fact that you can not scrub the floors. Eww. Also, the teal, turquoise, purple, pink, beige mix really does nothing for me.


I don't know many people that have run across the next no-no. If you have a bathroom counter, don't paint it with a really thick layer of paint. Now, just in case you do paint it with a really thick layer of paint, whatever you do, DON'T leave a cup of water on the counter or this will happen:


The last item I have is not really a no-no so much as a design flaw. While the bathtub is the longest tub I have ever taken a bath in...the shower is one of the smallest I have taken a shower in. You can see by the picture below that the shower head was about 5 1/2" feet tall. While I have dealt with short shower heads before (every hotel I have ever stayed in), I have never had one so short with a shower stall so narrow. I will just say that this shower turned into a death trap during my pregnancy. We really need something bigger.


So now I am busy collecting magazine clippings and starting to make plans for this bathroom. Any comments or ideas are welcome!

Wednesday, October 22, 2008

That Silly Dexter! Cutting Up Bad People Again...

I bet you would never guess that this post is about pickled beets. Oh yeah. Not the soggy, nasty, store-bought kind that you only see at salad bars in restaurants...but real home-made pickled beets. There is a big difference so don't write off these little guys until you try this super easy pickled beets recipe.


Now as you can see, here is the recipe written out by my mother-in-law. As you can also see, this is what happens to the recipe written out by my mother-in-law when there is a baby and a dog in the house. When one drops something...the other one is right there to pick it up. I swear they are working together to drive me crazy.


And here are the beets! Ugly little things but the do cook up quite nicely. Cut the tops off and put them in a pot of boiling water. Cook until tender...like a potato.


Now this is where The whole "Dexter" reference comes in. Scary, morbid, crazy right? To really understand what I am talking about, you have to watch the opening credits of the show. (For those of you that never will watch Dexter, click here.) We just happened to be watching season 2 when I made these beets.


Pickled Beets

Courtesy of my mother-in-law Linda Joseph

Yield: 2 quarts of sliced beets

8-10 medium sized beets
1 cup water
1/2 water
1 tsp salt
4 Tbsp sugar
1/8 tsp cloves
1/8 tsp cinnamon

Trim greens off of beets. Wash and place in pot of boiling water. Cook until tender and can be easily pierced by a fork (mine took about 25 minutes).

Trim and peel beets. Slice and place into quart jars. (You can play around with the thickness of your slices...just depends on how much beet you can take.)

Stir together, vinegar, water, salt, sugar, cloves, and cinnamon in a small pot just until heated through. Divide and pour into jars over beets.

Let stand over night and enjoy!

Monday, October 20, 2008

An Excellent Use For An Apple

Be prepared because this salad is good. Not in the "it is healthy so I better eat it" good but more of the "get out of my way before someone gets hurt" good. Plus it is a vinaigrette..which automatically makes it sound fancy and not something a mere mortal could make. Cool.


(Look! A hairy little hobbit hand!)


Spinach Salad with Maple-Dijon Vinaigrette

Borrowed from Cooking Light

Yield:8 servings

Ingredients
1/4 cup maple syrup (use real maple syrup otherwise it tastes fake)
3 tablespoons minced shallots (about 1 medium)
2 tablespoons red wine vinegar
1 tablespoon canola oil
1 tablespoon country-style Dijon mustard
1/4 teaspoon salt
1/4 teaspoon freshly ground black pepper
1 garlic clove, minced
1 cup sliced mushrooms (I added an extra 1/2 cup)
1/2 cup vertically sliced red onion
1/2 cup chopped Braeburn apple (just add the whole thing)
4 bacon slices, cooked and crumbled
1 (10-ounce) package fresh spinach

Preparation

1. Combine first 8 ingredients in a large bowl, stirring with a whisk. Add mushrooms and remaining ingredients; toss well to coat.

Sunday, October 19, 2008