Yeah that is me on our wedding day. There is something about posing with your two brothers that just makes you go crazy...or maybe just try to appear tougher than what you are. Anyways, a friend of ours is getting married in March and she was asking me for some ideas. Haha! Oh how I enjoy this type of post!
Idea #1: The Wedding Cake
I really, really despise wedding cakes. I do not think I have ever had one that tastes good no matter how much (insert random fruit here) crap they put in between the layers. Our solution? Cupcakes. Yum. Not only do they taste better, but they are pretty low maintenance i.e. you don't have to bring in another set of dishes to serve them off of.
The second best thing about cupcakes are the towers. You can make them yourself and personalize them to go with your color theme without the introduction of fondant (ick). Here are some great examples:


My good friend Byron came up with the idea for this cupcake tower. He spray painted an old water heater tray beige and then lined it with sod. The whole thing was supported by 4 pieces of pipe that screwed into 4 bolts that were glued on to the bottom of a piece of plywood. The other two levels were terracotta pots painted to match the ribbon. I had a regular cake made up for the top of the tower and gave the bakery the ribbon to put around it. Now, when putting the tower together, make sure to glue dot everything into place...otherwise you might get this...

a very slippery top cake when you try to cut it!
Here is another cupcake tower I did for my father-in-law's birthday. I found "milk" glass candy bowls to make up the towers and an old lamp shade to make up the base. Once again, I painted the plywood black and lined it with coordinating ribbon. Those cupcakes were chocolate graham cracker and a regular chocolate...just in case you were wondering why they looked a little funny.

If these don't suit your fancy, there are two other ideas at
CakeJournal and
Craftzine.
Idea #2: Table Setting
We literally rolled out sod down the middle of the wood tables, cut it in half lengthwise, then lined it with ribbon, again, all Byron's idea. He also found some blue and green place mats for $7 at GoodWill and coordinating fabric for napkins. I bought little terracotta pots and planted each with white flowers and then gave them away as gifts.


Idea #3: The Location
I realize that some people like the whole indoor wedding thing but if you really want to save some money, go outside. We rented out a campsite for the weekend and gave people the choice to either get a hotel room or camp outside. I think the total cost came to $60. Steal! Plus the outdoors is a great backdrop! You can cut down on the amount of flowers/ decorations needed.

There is one minor drawback, everyone will bring their dogs...which in our case, was a lot of dogs. Make sure to get them all locked up before the ceremony.

And last but not least, enjoy the day and make some memories!

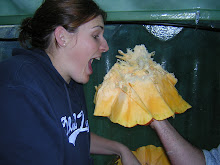
Ok no, this is really last but not least. LJ sang me a glorious song! It was awesome but the pictures we have of him singing reminds me of the picture I have of him eating that final slice of pizza in the pizza eating contest....




 Pause, and flex for your husband so you can show off your big muscles from carrying around the kid all the time. Please no sneaking peaks at all the other projects in the works. Also, please don't mind my rolled up sweats from 10 years ago and tie-dye doo rag. Really people...I am playing in dirt.
 Next, after you stop admiring my whiteness, thread your tomato plant through the hole cut in the planter. Use the edge of a table and your knee to prop it up while pushing the leaves through.

 This is the only part that is tricky...and not "oh it is hard to do tricky" but "what the heck can I use here instead of a sponge tricky". I tried some leftover weed barrier that I had laying around but I am almost positive that you could use a plastic bag as well...or anything else that would help the dirt stay in the planter. Cut a slit in one side of whatever material you are using (like you are making a Pac-Man shape) and wrap it around the stalk of your plant. Make sure to overlap the cut so no dirt is showing through the bottom.

 Then fill it with dirt and hang it up! On that note, make sure you have everything ready to go so you can hang it up as soon as you fill it with dirt. Once your plant is in...you can't put it down.

 The plant on the right was planted a couple of days before the other two. The tomatoes will try to right themselves but will eventually be weighed down by the awesome amount of tomatoes they will produce. I can't wait!
 ...and on the wall across the way. I have a lot of spices.

 Next I found 4 oz. metal tins at Bella's Market in Baker. For those of you that don't have a Bella's Market nearby, I also found these little guys that would work too. Labeled and put into place, the spices look pretty sweet hanging on the wall. They are also really easy to scoop a measuring spoon into. Big plus.


 I still have more spices to label when I get a chance. If I need to get another box, I think it would be cool hanging somewhere near this one. What do you guys think?

 Some pretty magenta spray paint...
 ...pair it with an old glass light shade...also free.

 A sweet outdoor table!
 I was like a kid in a candy shop! Each little plant was labeled and packaged separately and I had no problem telling what was what. The seller even threw in 2 free plants.
 After reading up on transplanting these little guys, I ended up sticking them about a 1/2 inch down into to dirt and then watered them thoroughly.


 Not bad for $24! Check out more from this seller here.
 Start by tracing out your lamp shade on a piece of paper. I used dollar store paper. This is what it should look like after you are done...just roll it along and mark as you go. Make sure to use a pencil because you don't want to leave marks on your shade.
 Next, cut the pattern out and lay it in your shade to make sure everything fits. Trim as needed.
 Then lay your pattern down onto your fabric. I recommend using a rotary cutter if you can. Cut out.
 Starting on the lamp shade seams (you want to match the seams up) spray adhesive on to your fabric and press firmly to the shade. Work in small patches to make sure you stay on line with your borders.
 You might have to trim up your edges a little. Tuck them into the edge of your shade with your fingernail.
 Let dry for a few hours then set on your lamp!

 Turns out I should have thought twice due to the fact that they were covered in a nice thick layer of nicotine. Yum. I had to scrub them both in the sink and then let them dry for a day. Just in case you wanted to know, you can scrub a lamp with soap and water.
 I know. Way too Barney the Purple Dinosaur for me. Also, don't ever, EVER, EVER use Krylon paint. I had the worst experience with the can of Rich Plum that I bought. It clogged up and took a lot of coats to cover the lamp...and no Rustoleum is not giving me any money to say that! But look!
 Oh my trusty can of RustOleum in Purple! I will never stray again. I followed up the 4 coats of purple with two coats of a spray-on acrylic glaze to make things even shinier...
 ...and voila! I am pretty sure that I need a longer lamp shade but this was all they had at our local store. What do you guys think? Are you feeling the purple or not? I paired it with the light beige shade to tone it down a little. The white shade was a little too Totally 80's for me. Not to bad for $5 each.


 a very slippery top cake when you try to cut it!
 If these don't suit your fancy, there are two other ideas at CakeJournal and Craftzine.

 Idea #3: The Location
 There is one minor drawback, everyone will bring their dogs...which in our case, was a lot of dogs. Make sure to get them all locked up before the ceremony.
 And last but not least, enjoy the day and make some memories!
 Ok no, this is really last but not least. LJ sang me a glorious song! It was awesome but the pictures we have of him singing reminds me of the picture I have of him eating that final slice of pizza in the pizza eating contest....

 That is right. One can really truly never have enough gold and black items in their house. Loran was cringing when I brought home this beauty and plunked it down on our front porch. However, I thought it would be really cool painted a glossy white.


 Posts