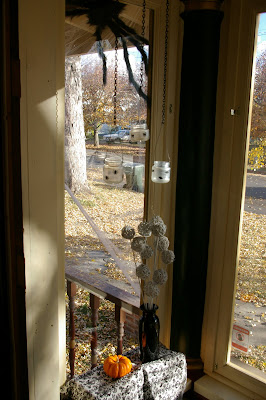
Let's see things you should know..the votives were made out of Jack's old baby food jars...Anne gave me the idea from an old Martha Stewart craft...the black vase was/is a spray painted over dollar store abomination...the wicker globes were also from the dollar store and the painted white...there was going to be two vases with longer ball flowers but I broke one of the freshly painted vases while chasing a chicken out of the garage...and if you don't carve your pumpkins you can leave them on your front door step as Thanksgiving decorations. Hmm I probably could paint them white for Christmas as well. Kidding.
Showing posts with label Halloween. Show all posts
Monday, November 3, 2008
Just Didn't Meet the Deadline...
While the house was decorated for Halloween, the paint used was not dry. Here are some of the projects that I was scrambling to get finished before the holiday:


Let's see things you should know..the votives were made out of Jack's old baby food jars...Anne gave me the idea from an old Martha Stewart craft...the black vase was/is a spray painted over dollar store abomination...the wicker globes were also from the dollar store and the painted white...there was going to be two vases with longer ball flowers but I broke one of the freshly painted vases while chasing a chicken out of the garage...and if you don't carve your pumpkins you can leave them on your front door step as Thanksgiving decorations. Hmm I probably could paint them white for Christmas as well. Kidding.
Labels:
Halloween
Friday, October 31, 2008
Goblins, Ghouls and the KKK?
Wee doggies! This is Halloween in Baker City Oregon! The city blocks off Main Street and all the businesses have candy for the kids. It is safe, you know the people handing out the candy, and it is all over by 6 pm. Here are some pictures from the event..


This picture reminds me of my brother...big, burly guy with the cutest little girl!


It is ok, buddy. You're soul won't get caught in the little black box I am pointing at you.


So I really didn't have a "costume" for Jack. It seemed a little pointless to me because he was going to be in his stroller the whole time with a "blanket" over him. But then I started to feel like a "bad mother" so I used my "false" eyelash adhesive to glue some "eyebrows" to his face. He was supposed to be "Mr. Clean" but then he got grumpy...so we changed his costume to "John McCain".

Hmm I think there is a Halloween costume "appropriate" lesson here. Supposedly, the guy wearing this outfit was Hispanic and he was going for irony. My vote is that this costume, along with an older "Alice" that left no room for wonder in her little outfit, are totally inappropriate for this event. Am I wrong here?
This picture reminds me of my brother...big, burly guy with the cutest little girl!
It is ok, buddy. You're soul won't get caught in the little black box I am pointing at you.
So I really didn't have a "costume" for Jack. It seemed a little pointless to me because he was going to be in his stroller the whole time with a "blanket" over him. But then I started to feel like a "bad mother" so I used my "false" eyelash adhesive to glue some "eyebrows" to his face. He was supposed to be "Mr. Clean" but then he got grumpy...so we changed his costume to "John McCain".
Hmm I think there is a Halloween costume "appropriate" lesson here. Supposedly, the guy wearing this outfit was Hispanic and he was going for irony. My vote is that this costume, along with an older "Alice" that left no room for wonder in her little outfit, are totally inappropriate for this event. Am I wrong here?
Labels:
Halloween
Excuse Me, Are You Going To Eat Them?

Happy Halloween everyone!!
For those of you that do not know, I am a scary movie connoisseur. Zombies are my weakness followed by vampires, then weird mutant things. I tend to not like slasher films due to the fact that they are so predictable and the girls poor running form. Since today is Halloween, I thought I should share my list of horrific delights with all of you!
Some of these are classics while others were just plain scary! These are definitely the must-sees:
Night of the Living Dead (the 1968 version)
The Descent
The Exorcist (the part where she runs down the stairs upside down is freaky)
28 Days Later (the first really scary-there-is-no-way-I-could-out-run-those-mothers zombie movie..the ending was a little dreary, but overall, still worth it)
Shaun of the Dead (funny, funny, funny)
Dawn of the Dead (the remake...fast zombies are scary! Plus a baby zombie birth? I am there!)
Evil Dead 2
Alien and Aliens (sci-fi can be scary too)
Jeepers Creepers (c'mon...this has the MAC guy in it)
These next ones are on my list of want to see:
Raw Meat
Reeker (how can this be bad?)
Pulse (the Japanese version NOT the one with Mandy Moore)
Habit
The Wisdom of Crocodiles
Let the Right One in
Jaws 5 (hopefully better then 2 and 4...umm I kinda' like 3..you know..with the dolphins and Dennis Quaid)
Dead Meat (this looks absolutely awful...a must see by Peter Jackson...yes, Lord of the Rings guy)
I, Zombie (like the fly but with a zombie...how can that be bad?)
Lastly, because you will all be out and about tonight, I leave you with this little video to help ensure your safety and avoid any "complications".
Labels:
Halloween
Sunday, October 26, 2008
That Is Mrs. Rattle-Can Queen to You
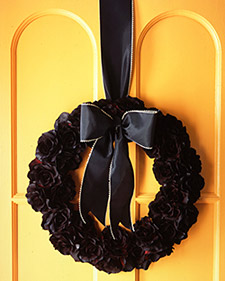
Sooooo my next Halloween decor project was a little more time consuming then planned. I got the idea for this wreath from Martha (yes, I still visit her site even though she dissed me). Her wreath called for silk roses and floral paint...umm expensive. I settled on plastic roses and my handy-dandy black high gloss spray paint. This is Martha's wreath...

And this is my wreath!

It actually came out pretty cute...in a dark and Gothic way. The ribbon is black but for some reason keeps coming out chocolate colored in the pics. I like the bow off to the side...cause I am cool like that. Ok not really...it wasn't big enough for the top and plus, I really do think it looks kinda' cool on the side.
This is a really easy wreath to make. If you want Martha's here are the instructions. If you feel like doing it on the cheap, here is my plan:
Materials:
about 5 bunches of dollar store red roses
14" floral foam wreath (also a dollar store purchase)
1/2 yard 2" black ribbon
glue gun
black spray paint (a.k.a. rattle can...shout-out to LRobb for the new terminology!)
wire cutting pliers

Snip the roses off the flower stems and put into a big pile. Hint: Make sure to mix the flowers up because not all dollar store roses are the same. This will keep your wreath looking balanced. Use your hot glue gun to glue the roses to the foam wreath. Keep them pretty tight so no gaps are peeking through. Spray paint a light coat on the back of the wreath first...covering the lovely green wreath. After it dries to the touch, flip it over and coat the flowers with paint. You can go lighter for a not too dead look or heavier for a morbid and icky but still chic look.

And this is my wreath!
It actually came out pretty cute...in a dark and Gothic way. The ribbon is black but for some reason keeps coming out chocolate colored in the pics. I like the bow off to the side...cause I am cool like that. Ok not really...it wasn't big enough for the top and plus, I really do think it looks kinda' cool on the side.
This is a really easy wreath to make. If you want Martha's here are the instructions. If you feel like doing it on the cheap, here is my plan:
Materials:
about 5 bunches of dollar store red roses
14" floral foam wreath (also a dollar store purchase)
1/2 yard 2" black ribbon
glue gun
black spray paint (a.k.a. rattle can...shout-out to LRobb for the new terminology!)
wire cutting pliers
Snip the roses off the flower stems and put into a big pile. Hint: Make sure to mix the flowers up because not all dollar store roses are the same. This will keep your wreath looking balanced. Use your hot glue gun to glue the roses to the foam wreath. Keep them pretty tight so no gaps are peeking through. Spray paint a light coat on the back of the wreath first...covering the lovely green wreath. After it dries to the touch, flip it over and coat the flowers with paint. You can go lighter for a not too dead look or heavier for a morbid and icky but still chic look.
Monday, October 13, 2008
I love Halloween!
Obviously, our dog Inchie does not share the same enthusiasm.

She really hates this hat.

But I really do love Halloween. The scary movie marathons, crisp fall nights, carved pumpkins on the porch, and of course, my very two very favorite things, coming up with costume ideas and decorating our house.
The latter has proved to be a bit of a challenge since moving to a small town. However, it really is not the lack of shopping opportunities that proves to be frustrating as the early mobilization of Christmas Crap. C'mon people! If you need more than a month's time to buy Christmas decorations, then you are buying too much and it will look too gaudy. Really.
Back to the point, I have decided to try and make all my holiday decorations for this year starting with Halloween. I want things that are nice, classy, and not made in China...oh and CHEAP. So for project numero uno I give you...Creepy Spider Candlesticks! (Ok, so that name doesn't really do anything for me...but I had to call them something.)
Behold! (Insert scary ominous laughter) Wait...no scary laughter here yet. These are the before pictures.

My husband Loran's grandmother LOVES to buy random things at garage sales. She picked these beauties up for $1.50.

After I cleaned and polished the candlesticks up, I placed them on a piece of wood that I could maneuver around to get all sides with Rust-Oleum Painter's Touch in Black Gloss.

Out of focus but you get the idea...I sprayed all 3 sticks with 3 coats of paint.

Next, I sponged on Modern Masters Metallic Paint in Sheer Pearl White onto the inside of the glasses. If I were to do it again, I would try blobbing paint on with a sponge to give it more of a crackled look.

Dry my pretties!

I decided that they were a little dull so I wanted to add a cute little spider. I just sponged it on with some Mod-Podge.

As you can see, it dries clear and really looks like a little spider...a squished flat little spider, but a spider all the same.

Now cue scary ominous laughter!! Whaa-haa-haaa-ha-haaaa!
She really hates this hat.
But I really do love Halloween. The scary movie marathons, crisp fall nights, carved pumpkins on the porch, and of course, my very two very favorite things, coming up with costume ideas and decorating our house.
The latter has proved to be a bit of a challenge since moving to a small town. However, it really is not the lack of shopping opportunities that proves to be frustrating as the early mobilization of Christmas Crap. C'mon people! If you need more than a month's time to buy Christmas decorations, then you are buying too much and it will look too gaudy. Really.
Back to the point, I have decided to try and make all my holiday decorations for this year starting with Halloween. I want things that are nice, classy, and not made in China...oh and CHEAP. So for project numero uno I give you...Creepy Spider Candlesticks! (Ok, so that name doesn't really do anything for me...but I had to call them something.)
Behold! (Insert scary ominous laughter) Wait...no scary laughter here yet. These are the before pictures.
My husband Loran's grandmother LOVES to buy random things at garage sales. She picked these beauties up for $1.50.
After I cleaned and polished the candlesticks up, I placed them on a piece of wood that I could maneuver around to get all sides with Rust-Oleum Painter's Touch in Black Gloss.
Out of focus but you get the idea...I sprayed all 3 sticks with 3 coats of paint.
Next, I sponged on Modern Masters Metallic Paint in Sheer Pearl White onto the inside of the glasses. If I were to do it again, I would try blobbing paint on with a sponge to give it more of a crackled look.
Dry my pretties!
I decided that they were a little dull so I wanted to add a cute little spider. I just sponged it on with some Mod-Podge.
As you can see, it dries clear and really looks like a little spider...a squished flat little spider, but a spider all the same.
Now cue scary ominous laughter!! Whaa-haa-haaa-ha-haaaa!
Labels:
before and after,
Halloween,
Make it your own
Subscribe to:
Posts (Atom)