Thursday, July 30, 2009
Check It!
You guys have to head on over to Classic Bride for a super duper surprise! (No...it is not more pictures of pimping wallpaper.)
Wednesday, July 29, 2009
I Am Pretty Sure That Rainbow Brite Threw up In Our Basement
Let me make something clear first...I like wallpaper. I really do. I go on to ferm living all the time and drool over their fun designs. That being said, I will avoid putting up wallpaper at all cost in our house.
Why, you ask? It is such the HOT thing to do!
Right....I reply...and obviously this was the HOT thing to do at one point...
 Oh wait...you can't tell just how beautiful this old wallpaper is? Let me get you a closer look.
 Yes, that is foil. It really only gets better...
 Ohhh there we go. Because the angled lines of foil were too "busy"...thank god they put in some vertical lines to calm the pattern down.
Seeing this got me thinking...why not show you all the glimpses of old wallpaper in our house! Ready for this?!
 The Good...Trains and Trolleys really aren't that bad in an kid's room...
 The Bad...the master bedroom...thank god I never saw it with this striped/flower color scheme...that would hurt.
 Yep, the ugly. I hope the shininess comes through on your monitors so you can bask in the glow!
Monday, July 27, 2009
July's Daring Baker's Challenge: My Little Army of Marshmallowey Goodness
When I first saw what July's DB Challenge was, I automatically thought of my dad. He loves chocolate covered marshmallow anything. I will figure out away to send him some when it is not 90 degrees outside.
On to the cookie which makes WAY more than listed 24 cookies. I ended up doubling the marshmallow puff part but everything else worked fine as listed. I was a little short of the chocolate covering but Wade and LJ didn't mind eating all the extras for me. Yum.


On to the cookie which makes WAY more than listed 24 cookies. I ended up doubling the marshmallow puff part but everything else worked fine as listed. I was a little short of the chocolate covering but Wade and LJ didn't mind eating all the extras for me. Yum.


Mallows(Chocolate Covered Marshmallow Cookies)
Recipe courtesy Gale Gand, from Food Network website
Prep Time: 10 min
Inactive Prep Time: 5 min
Cook Time: 10 min
Serves: about 2 dozen cookies
• 3 cups (375grams/13.23oz) all purpose flour
• 1/2 cup (112.5grams/3.97oz) white sugar
• 1/2 teaspoon salt
• 3/4 teaspoon baking powder
• 3/8 teaspoon baking soda
• 1/2 teaspoon ground cinnamon
• 12 tablespoons (170grams/ 6 oz) unsalted butter
• 3 eggs, whisked together
• Homemade marshmallows, recipe follows
• Chocolate glaze, recipe follows
1. In a mixer with the paddle attachment, blend the dry ingredients.
2. On low speed, add the butter and mix until sandy.
3. Add the eggs and mix until combine.
4. Form the dough into a disk, wrap with clingfilm or parchment and refrigerate at least 1 hour and up to 3 days.
5. When ready to bake, grease a cookie sheet or line it with parchment paper or a silicon mat.
6. Preheat the oven to 375 degrees F.
7. Roll out the dough to 1/8-inch thickness, on a lightly floured surface. Use a 1 to 1 1/2 inches cookie cutter to cut out small rounds of dough.
8. Transfer to the prepared pan and bake for 10 minutes or until light golden brown. Let cool to room temperature.
9. Pipe a “kiss” of marshmallow onto each cookie. Let set at room temperature for 2 hours.
10. Line a cookie sheet with parchment or silicon mat.
11. One at a time, gently drop the marshmallow-topped cookies into the hot chocolate glaze.
12. Lift out with a fork and let excess chocolate drip back into the bowl.
13. Place on the prepared pan and let set at room temperature until the coating is firm, about 1 to 2 hours.
Note: if you don’t want to make your own marshmallows, you can cut a large marshmallow in half and place on the cookie base. Heat in a preheated 350-degree oven to slump the marshmallow slightly, it will expand and brown a little. Let cool, then proceed with the chocolate dipping.
Homemade marshmallows:
• 1/4 cup water
• 1/4 cup light corn syrup
• 3/4 cup (168.76 grams/5.95oz) sugar
• 1 tablespoon powdered gelatin
• 2 tablespoons cold water
• 2 egg whites , room temperature
• 1/4 teaspoon pure vanilla extract
1. In a saucepan, combine the water, corn syrup, and sugar, bring to a boil until “soft-ball” stage, or 235 degrees on a candy thermometer.
2. Sprinkle the gelatin over the cold water and let dissolve.
3. Remove the syrup from the heat, add the gelatin, and mix.
4. Whip the whites until soft peaks form and pour the syrup into the whites.
5. Add the vanilla and continue whipping until stiff.
6. Transfer to a pastry bag.
Chocolate glaze:
• 12 ounces semisweet chocolate
• 2 ounces cocoa butter or vegetable oil
1. Melt the 2 ingredients together in the top of a double boiler or a bowl set over barely simmering water. (I found that these will only set once refrigerated)

Sunday, July 19, 2009
"I Love the Smell of Cat Pooh in the Morning"
I am starting a new series called "Old Wives Tales" where I will be trying out different items that work for other, sometimes, more environmentally friendly purposes.
This is how we will rate things:
1-A complete and utter failure in ever single way possible
2-Some SERIOUS issues but we can see how it might work...in some far off land
3-Downsides still outweigh upsides
4-Pretty sweet deal...HOWEVER (fill in the blank)
5-Perfect in every way
First item up for grabs are coffee grinds! What will they supposedly do? Stop cats from pooping in your flowers beds.
While I love our neighborhood, I despise our neighbors cats. Yes cats plural because there are about 8 of them roaming around. Inchie does a good job of keeping them away from the door but they do seem to like pooping in our flower bed. The smell is a little pungent at times.
I started testing the coffee grind theory about 2 months ago and I am just now really starting to notice a difference. I have been emptying our french press pot-o-grinds in the flower bed at least three times a week and also dumped a container of old coffee grinds in there as well. Honestly, I can't tell if the cats are not pooping in that area because it smells like coffee when you walk up to the front porch. Oh...and there might have been a few weeks were it vaguely smelled like a Starbucks filled with pooping cats. But not now! It is soooo much better than before!
Old Wives Tale:Coffee grinds repels cats
Our ruling: 4/5 Pretty sweet deal...HOWEVER I am not quite sure that there is nothing going on in the flower beds any more...I just can't smell it. Also takes a fair amount of reoccurring coffee grind coverage to get the job done. But hey, it beats dumping them in the trash and it is good for your plants too!

(In all fairness, our kitten is very well-trained and would never use our planter for such a vile thing.)
Friday, July 17, 2009
Look What I Found!
 I know it is a hot mess right now (nicotine covered...damn you smokers!) but this is a General Fireproofing Co. Tanker Desk that was at our local Salvation Army.
What's the big deal you ask? Well you can check this desk out here and here as well. I have no idea what model mine is due to the fact that I can't find a pic of it anywhere. It does have a spring loaded typing tray that almost took Wade's face off though. Oh, and if it is worth more than $15...then I am good to go!
Monday, July 13, 2009
Happy Monday!
 I hope you all enjoy your Monday as much as Jack enjoyed this pickle. Thanks for the pic J. Robb!
Tuesday, July 7, 2009
Just Make Yourself a Dang Quesadilla!
It is a total crap shoot as to whether Jack will eat what I am making for dinner. One night, he will scarf all the chicken and the next spit out anything that even touched chicken. Forget about beef while marinara sauce is ok if he dips his pasta into it. To avoid going crazy, I always keep a back-up in the fridge. Something that I can pull out if he decides nothing on his plate taste good. Right now, that something is whole-wheat broccoli and cheese quesadillas. (I know this looks incredibly easy, and it is, but a friend of mine thought this was the best idea ever. So I am putting in up here just in case you haven't thought of it yet.)
 Whole-Wheat Broccoli and Cheese Quesadillas
2 whole-wheat tortillas
1/2 cup cheddar cheese (feel free to mix up your cheeses...mozzarella is also big at our house)
2-3 Tbsp. frozen broccoli, broken up into little pieces
Heat the pan on medium heat, throw the tortilla down, sprinkle some cheese, place to broccoli over the cheese, sprinkle a little more cheese (this creates a lock so the broccoli stays in and won't fall out), top with the other tortilla and heat until everything is melted. Then cut it up into small triangles and serve warm or cold. This is a great travel food too. Enjoy!

Sunday, July 5, 2009
Homemade Upside Down Tomato Planter!
Now that we have our lovely egg-laying, plant-scratching, fertilize the world chickens, growing anything on the ground is a challenge. It takes a total of 5 seconds for one of my lovely ladies to rip out a plant and scratch it all to shreds. When it came time to plant some veggies around the yard, I had to get creative.
I have seen commercials for the Topsy-Turvy tomato planter but at $20 a pop (for a plastic bag and a sponge), making my own was at the top of my list. Soooo here we go!
First, find a hanging planter that does not have a drip tray attached. I found some at Bi-Mart for $6. With a utility blade, cut a hole in the bottom that is just big enough to get your tomato plants through without breaking off leaves. Mine was about 2" in diameter.

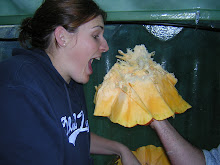
 Pause, and flex for your husband so you can show off your big muscles from carrying around the kid all the time. Please no sneaking peaks at all the other projects in the works. Also, please don't mind my rolled up sweats from 10 years ago and tie-dye doo rag. Really people...I am playing in dirt.
 Next, after you stop admiring my whiteness, thread your tomato plant through the hole cut in the planter. Use the edge of a table and your knee to prop it up while pushing the leaves through.

 This is the only part that is tricky...and not "oh it is hard to do tricky" but "what the heck can I use here instead of a sponge tricky". I tried some leftover weed barrier that I had laying around but I am almost positive that you could use a plastic bag as well...or anything else that would help the dirt stay in the planter. Cut a slit in one side of whatever material you are using (like you are making a Pac-Man shape) and wrap it around the stalk of your plant. Make sure to overlap the cut so no dirt is showing through the bottom.

 Then fill it with dirt and hang it up! On that note, make sure you have everything ready to go so you can hang it up as soon as you fill it with dirt. Once your plant is in...you can't put it down.

 The plant on the right was planted a couple of days before the other two. The tomatoes will try to right themselves but will eventually be weighed down by the awesome amount of tomatoes they will produce. I can't wait!
Total cost: $18...3 planters at $6 a piece, tomatoes were free from the Rock Garden Nursery here in town. They were getting rid of all their veggies before they moved. Score one for the big girl.
I have seen commercials for the Topsy-Turvy tomato planter but at $20 a pop (for a plastic bag and a sponge), making my own was at the top of my list. Soooo here we go!
First, find a hanging planter that does not have a drip tray attached. I found some at Bi-Mart for $6. With a utility blade, cut a hole in the bottom that is just big enough to get your tomato plants through without breaking off leaves. Mine was about 2" in diameter.

 Pause, and flex for your husband so you can show off your big muscles from carrying around the kid all the time. Please no sneaking peaks at all the other projects in the works. Also, please don't mind my rolled up sweats from 10 years ago and tie-dye doo rag. Really people...I am playing in dirt.
 Next, after you stop admiring my whiteness, thread your tomato plant through the hole cut in the planter. Use the edge of a table and your knee to prop it up while pushing the leaves through.
 This is the only part that is tricky...and not "oh it is hard to do tricky" but "what the heck can I use here instead of a sponge tricky". I tried some leftover weed barrier that I had laying around but I am almost positive that you could use a plastic bag as well...or anything else that would help the dirt stay in the planter. Cut a slit in one side of whatever material you are using (like you are making a Pac-Man shape) and wrap it around the stalk of your plant. Make sure to overlap the cut so no dirt is showing through the bottom.
 Then fill it with dirt and hang it up! On that note, make sure you have everything ready to go so you can hang it up as soon as you fill it with dirt. Once your plant is in...you can't put it down.
 The plant on the right was planted a couple of days before the other two. The tomatoes will try to right themselves but will eventually be weighed down by the awesome amount of tomatoes they will produce. I can't wait!
Total cost: $18...3 planters at $6 a piece, tomatoes were free from the Rock Garden Nursery here in town. They were getting rid of all their veggies before they moved. Score one for the big girl.
Subscribe to:
Posts (Atom)