Tuesday, January 27, 2009

If Life Deals You Lemons Make a Teenie Tiny Thimble Full of Lemonade

I am pretty sure that is not how that quotes goes but rather how my life goes. Just as my little basketball team was starting to win, we were struck by two season ending injuries to my two top players. You are kidding me right.

That is about as funny as my Meyer Lemon tree that my mother-in-law got me for my b-day last year. In the planting instructions, there was a clause that said the tree would be bearing fruit in about a year. Yeah right! This tree was tiny when I first got it...well let me eat my words because about 2 weeks ago...these started.
I know...you are thinking yeah for the lemon tree. What is your problem Jenny? Well, let me just put things in perspective for you...
Yes they are that small! What is going on here? Am I going to get tiny, bite size lemons? Does any else out there have a indoor Meyer tree?? HELP!

Saturday, January 24, 2009

Some Badass Wedding Ideas


Yeah that is me on our wedding day. There is something about posing with your two brothers that just makes you go crazy...or maybe just try to appear tougher than what you are. Anyways, a friend of ours is getting married in March and she was asking me for some ideas. Haha! Oh how I enjoy this type of post!

Idea #1: The Wedding Cake
I really, really despise wedding cakes. I do not think I have ever had one that tastes good no matter how much (insert random fruit here) crap they put in between the layers. Our solution? Cupcakes. Yum. Not only do they taste better, but they are pretty low maintenance i.e. you don't have to bring in another set of dishes to serve them off of.

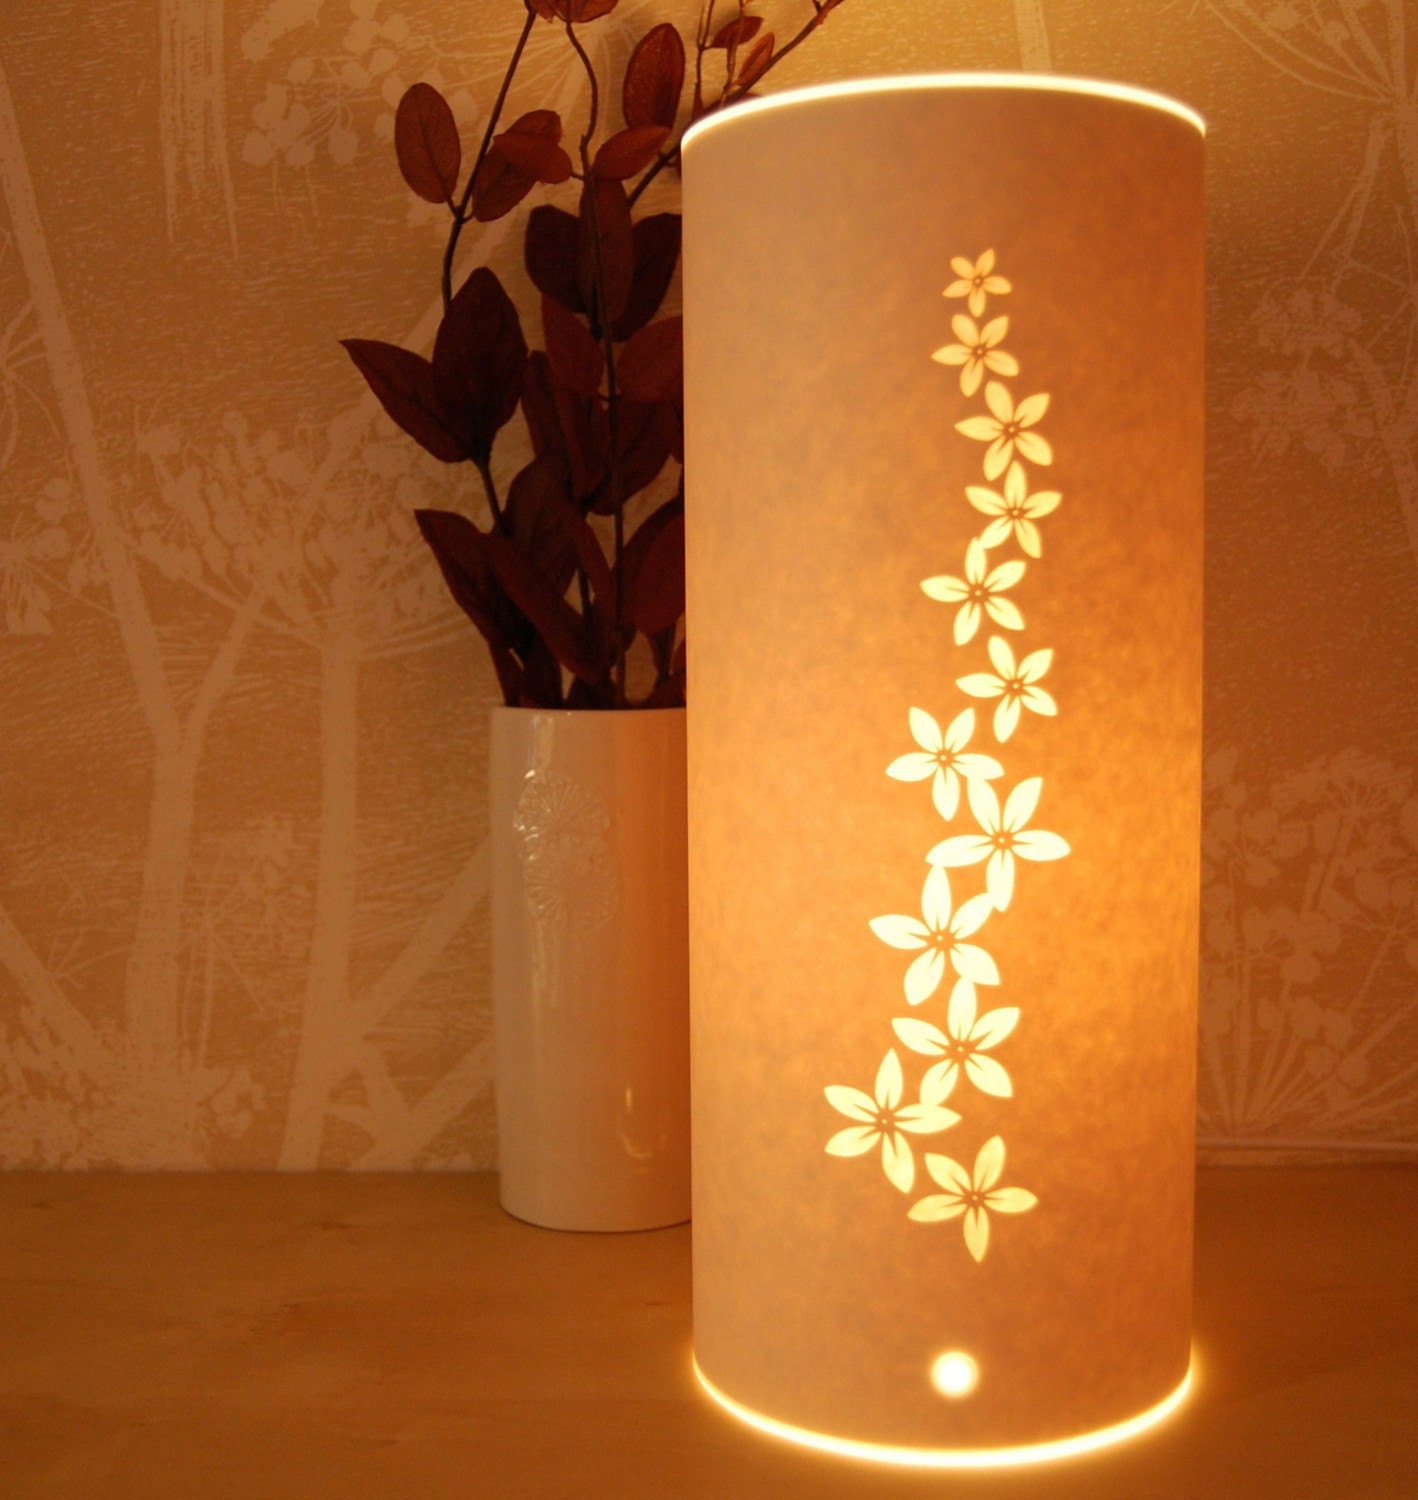
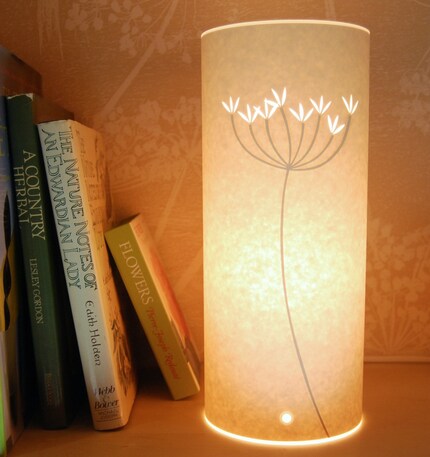
The second best thing about cupcakes are the towers. You can make them yourself and personalize them to go with your color theme without the introduction of fondant (ick). Here are some great examples:


My good friend Byron came up with the idea for this cupcake tower. He spray painted an old water heater tray beige and then lined it with sod. The whole thing was supported by 4 pieces of pipe that screwed into 4 bolts that were glued on to the bottom of a piece of plywood. The other two levels were terracotta pots painted to match the ribbon. I had a regular cake made up for the top of the tower and gave the bakery the ribbon to put around it. Now, when putting the tower together, make sure to glue dot everything into place...otherwise you might get this...
a very slippery top cake when you try to cut it!

Here is another cupcake tower I did for my father-in-law's birthday. I found "milk" glass candy bowls to make up the towers and an old lamp shade to make up the base. Once again, I painted the plywood black and lined it with coordinating ribbon. Those cupcakes were chocolate graham cracker and a regular chocolate...just in case you were wondering why they looked a little funny.

If these don't suit your fancy, there are two other ideas at CakeJournal and Craftzine.

Idea #2: Table Setting
We literally rolled out sod down the middle of the wood tables, cut it in half lengthwise, then lined it with ribbon, again, all Byron's idea. He also found some blue and green place mats for $7 at GoodWill and coordinating fabric for napkins. I bought little terracotta pots and planted each with white flowers and then gave them away as gifts.

Idea #3: The Location
I realize that some people like the whole indoor wedding thing but if you really want to save some money, go outside. We rented out a campsite for the weekend and gave people the choice to either get a hotel room or camp outside. I think the total cost came to $60. Steal! Plus the outdoors is a great backdrop! You can cut down on the amount of flowers/ decorations needed.

There is one minor drawback, everyone will bring their dogs...which in our case, was a lot of dogs. Make sure to get them all locked up before the ceremony.
And last but not least, enjoy the day and make some memories!
Ok no, this is really last but not least. LJ sang me a glorious song! It was awesome but the pictures we have of him singing reminds me of the picture I have of him eating that final slice of pizza in the pizza eating contest....

Tuesday, January 20, 2009

I Am A Sucker For Flowers

I know, I know. The big 6'5" girl likes super girlie things and although I have managed to put everything Sanrio behind me, flower prints still get me every time. On a recent Ikea shopping trip, I spotted this lamp and was immediately awestruck by the flower print cascading down the side. Ahhh pretty.

I fought the temptation and ending up putting this little guy back. Just a little too modern for the look I am going for in our house.

Thank god I came to my senses because I found something even better! Design*Sponge just put up a post on British designer Hannah Nunn and her these beautiful cut-paper lamps. Take a gander at these bad boys...


So pretty and delicate looking! The perfect mix...these are definitely going on my birthday wish list.

Friday, January 16, 2009

The New Beige?

This chair is wrong for so many reasons...
though if you had this wall mural...
nah. Still wrong.

Why I Blog


Awhile back at a dinner party, a friend asked me why I blog. I looked at him blankly and answered, "oh...because I like to." But that is not it. Why I blog is a very complex and multifaceted question. I will try to answer it here.

Reason #1- It keeps me sane. There are some days where I don't get out of the house. I have every intention of doing so but it just doesn't seem to happen. There are feedings and house work...and some laundry and oh yeah, bill paying...and before I know it, it is time to make dinner. To make matters even crazier, I have done the fun bun dance 3+ times for laughs, given 4 pinkbellies, performed a total of 45 minutes of exaggerated lip-smacking to get Jack to take big boy bites, and changed way too many diapers/pants/shirts. When you have a day like that, it is nice to sit down and use actual words to help keep your wits.

Reason #2- It keeps people in the loop. I live 10 hours away from old friends and family, blogging allows them to follow what I am doing and watch Jack grow up.

Reason #3- Sharing information! I am always searching for DIY ideas and projects and the blogging community is full of DIYers. Plus, I have made a couple of new friends!

Reason #4-I love taking pictures. I still don't know what all the buttons on my new camera do but I love figuring it out!

Reason #5-It is an online journal. I love looking back at things that we have done and projects that I have succeeded (or failed) in completing.

Reason #6- People like it. I realize that I don't get a ton of comments on my blog like some people do *cough* *cough* A. Sage a.k.a. Mrs. Popularity but I do get emails from people and funny voice mails from friends that follow along.

Reason #7- I really do enjoy it. I like creating my posts and coming up with new ideas. That is the main reason why I blog and I don't intend on quitting any time soon!

Tuesday, January 13, 2009

My "Fancy" Salad

This is my go-to quick meal. After trying LOTS of cornbread recipes, I happened to just try out the one on the box. Brilliant. LJ says that they are the best thing he has ever eaten. Jack and I concur.
Spinach Salad with Shrimp and Feta
Borrowed from Everyday with Rachael Ray
Serves 4...0r two if sharing with my husband

1/4 cup plus 3 T. olive oil
1 lb. shrimp, peeled and deveined
1 shallot, finely chopped
2 T. red wine vinegar
1 T. spicy mustard (I like to use a whole-grain Dijon)
1 T. honey
salt and pepper
8 oz. spinach
1/2 cup feta cheese

In a medium skillet, heat 3 tablespoons olive oil over medium-high heat. Add the shrimp and stir-fry until opaque, 2 to 3 minutes.
In a medium bowl, whisk together the shallot, vinegar, mustard and honey; season with salt and pepper. Pour in the remaining 1/4 cup olive oil in a slow stream, whisking constantly until thick. Using a slotted spoon, transfer the cooked shrimp to the dressing and toss to coat. Season to taste with salt and pepper.
Arrange the spinach on a platter or individual plates. Place the warm shrimp on top and drizzle with any remaining dressing. Scatter the feta on top.


Sweet Corn Muffins
Taken from the side of the Albers Yellow Corn Meal Box
Yields 18 muffins

1 1/2 cups all-purpose flour
2/3 cup granulated sugar
1/2 cup yellow corn meal
1 tablespoon baking powder
1/2 teaspoon salt
1 1/4 cups milk
2 large eggs, lightly beaten
1/3 cup vegetable oil
3 tablespoons butter or margarine, melted
*optional* 1/3 cup frozen corn (very, very good!!)

Preheat oven to 350° F. Grease or paper-line 18 to 20 muffin cups.
Combine flour, sugar, corn meal, baking powder and salt in medium bowl. Combine milk, eggs, vegetable oil and butter in small bowl; mix well. Add to flour mixture; stir just until blended. Pour into prepared muffin cups, filling 2/3 full.
Bake for 18 to 20 minutes or until wooden pick inserted in center comes out clean. Cool in pans on wire racks for 5 minutes; remove to wire racks to cool slightly. Serve warm.

FOR CORN BREAD:
POUR batter into greased 8-inch-square baking pan. Bake for 35 minutes or until wooden pick inserted in center comes out clean.

What We Have Been Up To...

I have been on task trying to spruce up our house after taking out the lovely wall-to-wall magenta carpet. Here is a before pic of our entryway (please excuse the boxes):
Stairs leading up to the second floor...which is also covered in glorious magenta!


And here is after!
I just ordered that great wool rug from Pottery Barn last week and realized after I got it that this entryway is really BIG. There are also four holes next to the door where the old radiators were located. Luckily, someone nailed down lids from old cans to cover two of the holes. I am sorry, I don't think I laid the sarcasm on thick enough with that "lucky"part. We will eventually repair the holes and redo the floors but that is WAY in the future. Also, we propped an old door up to block off the stairway because we are not using upstairs right now.

Anyways, I had two old bamboo mats from our last house that I threw down to cover all the holes and lids and I have to say that I kind of like the look of it. I don't know if I am crazy and just reaching here so I need to know what you all think. Too much?

(Holes in the floor a.k.a. Jack's new piggy bank. )

On to the second line of duty, I am in desperate need of a new light for the entryway. I really, really, really dislike this one. Not only is it ugly, but it hangs down almost a foot and a half from the ceiling and I constant smack my head on it. It needs to go so I am on the prowl for something new. I have no idea if I am supposed to tie it in with the dining room lighting or what...HELP!

And last but not least, I found more dining room chairs! Yes they need to be worked over a bit BUT I got six of the for $100. The thing is, they almost match the two that I found from the Salvation Army to a T. That makes the grand total $105.90 for 8 really sturdy chairs. Nice. Now I have to figure out how I am going to re-finish them (and no it won't be to match the pretty calico indoor/outdoor carpet seen here).

Thursday, January 8, 2009

Favorite Blog: Wholesome Baby Food


If you want to start making homemade baby food, here is a great source. This blog gave me the courage to break away from the pressure of feeding your baby commercially prepared baby food. It is so interesting how people believe that because a company lists "for infants/toddlers" on the label, consumers automatically buy it even if the product is available (and often times, the same) for adults. So please, check out this site and believe that feeding your baby some of the veggies and turkey off your plate is just as good (if not better) as feeding them from a store-bought jar.

Wednesday, January 7, 2009

Feeling Brighter

I am constantly trolling our local Salvation Army for furniture/lamps/dishes and anything else I can makeover. I found a lamp a couple of months ago that had a really cool exterior design. The only problem? It looked like this:
That is right. One can really truly never have enough gold and black items in their house. Loran was cringing when I brought home this beauty and plunked it down on our front porch. However, I thought it would be really cool painted a glossy white.

It is nearing the teens outside so my in-depth picture/documentary of my lamp makeover is non-existent. However, my better blogging half, Anne from The City Sage, has fully detailed instructions on how to paint a lamp. (I swear we did not meet about this project beforehand and her lamp shape is WAY prettier than mine...oh wait! Mine actually works...score one for the big girl!)

Since my lamp is textured, I did not have to worry about sanding it to get a fine finish like Anne did. It also didn't really matter if the paint sagged a little (that is the term the pros use when spray paint runs a bit...thanks dad!). After four coats of my lovely white RustOleum gloss spray paint, I let the base cure for 2 days. This is what I got!


I found a plain lamp shade from Ikea during a trip to Portland that works well. Total cost:$17.07
I will eventually choose some fabric to cover the lamp shade but I like it how it is right now. Yeah for lamps!

Monday, January 5, 2009

Please Act Today!


I just checked Angry Chicken's blog and realized that today is the last day to get in your comments to the CPSC regarding the new mandatory testing for all items made for kids under 12 that is going into effect in 35 days. Here is a bit from the CPSIA's website explaining what this testing would entail:

"The issue:
In 2007, large toy manufacturers who outsource their production to China and other developing countries violated the public's trust. They were selling toys with dangerously high lead content, toys with unsafe small part, toys with improperly secured and easily swallowed small magnets, and toys made from chemicals that made kids sick. Almost every problem toy in 2007 was made in China.

The United States Congress rightly recognized that the Consumer Products Safety Commission (CPSC) lacked the authority and staffing to prevent dangerous toys from being imported into the US. So, they passed the Consumer Product Safety Improvement Act (CPSIA) in August, 2008. Among other things, the CPSIA bans lead and phthalates in toys, mandates third-party testing and certification for all toys and requires toy makers to permanently label each toy with a date and batch number.

All of these changes will be fairly easy for large, multinational toy manufacturers to comply with. Large manufacturers who make thousands of units of each toy have very little incremental cost to pay for testing and update their molds to include batch labels.

For small American, Canadian, and European toymakers and manufacturers of children's products, however, the costs of mandatory testing will likely drive them out of business.

  • A toymaker, for example, who makes wooden cars in his garage in Maine to supplement his income cannot afford the $4,000 fee per toy that testing labs are charging to assure compliance with the CPSIA.
  • A work at home mom in Minnesota who makes cloth diapers to sell online must choose either to violate the law or cease operations.
  • A small toy retailer in Vermont who imports wooden toys from Europe, which has long had stringent toy safety standards, must now pay for testing on every toy they import.
  • And even the handful of larger toy makers who still employ workers in the United States face increased costs to comply with the CPSIA, even though American-made toys had nothing to do with the toy safety problems of 2007.
The CPSIA simply forgot to exclude the class of children's goods that have earned and kept the public's trust: Toys, clothes, and accessories made in the US, Canada, and Europe. The result, unless the law is modified, is that handmade children's products will no longer be legal in the US.

If this law had been applied to the food industry, every farmers market in the country would be forced to close while Kraft and Dole prospered.
"

How can you help?

Visit this site to get all the information you need to make a difference. Also, visit Angry Chicken's site for a more informative, eloquent, don't have basketball practice in 30 minutes explanation!


Sunday, January 4, 2009

Yum Baby Food: Sweet Potato Fries!


Jack loves, loves, LOVES him some sweet potato fries! No kidding. Baking them in the oven makes them nice and soft...the perfect finger food.

Sweet Potato Fries

Ingredients
One garnet or jewel yam (these are both a sweet, moist, orange-fleshed variety of sweet potato), peeled
1/2 T. olive oil (you can use less depending on the size of the yam)

Preheat the oven to 425 degrees F.

Cut the potatoes lengthwise into 1/2-inch thick matchsticks, and toss with the oil. Spray a baking sheet with cooking spray. Arrange the potatoes in a single layer on the baking sheet and bake until the "fries" are tender and slightly crisp, about 20-25 minutes. (You want them a little on the soggy side so they can be eaten easily.)

Serve when the fries have cooled enough to handle. Store any leftovers in the fridge for a snack.

Thursday, January 1, 2009

December Daring Baker's Challenge: French Yule Log

This is the longest recipe EVER. I will put my recommendations in bold print for those of you that care to read it and what I would make if I were to do it again in orange. If you do try this make the creme brulee insert first, then the praline crisp, followed by the dacquoise biscuit, mousse, and last but not least, the ganache insert.


FRENCH YULE LOG OR ENTREMETS RECIPE by Flore of Florilège Gourmand

Element #1 Dacquoise Biscuit (Almond Cake)

Preparation time: 10 mn + 15 mn for baking

Equipment: 2 mixing bowls, hand or stand mixer with whisk attachment, spatula, baking pan such as a 10”x15” jelly-roll pan, parchment paper

Note: You can use the Dacquoise for the bottom of your Yule Log only, or as bottom and top layers, or if using a Yule log mold (half-pipe) to line your entire mold with the biscuit. Take care to spread the Dacquoise accordingly. Try to bake the Dacquoise the same day you assemble the log to keep it as moist as possible.

My Note: You don't need a half-pipe pan for this recipe unless you want to get fancy. A regular size loaf pan worked perfect for me. I used the bottom and top of the loaf pan to make two templates for the Dacquoise. Just trace it with a pencil on to parchment and then flip it over and spoon the batter in. Very easy. Also, grind your own almond up to make the almond meal. Easier and cheaper than store bought. I made the chocolate version and it came out great!

Ingredients:
2.8 oz (3/4cup + 1Tbsp / 80g) almond meal
1.75 oz (1/2 cup / 50g) confectioner’s sugar
2Tbsp (15g) all-purpose flour
3.5oz (100g / ~100ml) about 3 medium egg whites
1.75 oz (4 Tbsp / 50g) granulated sugar

1. Finely mix the almond meal and the confectioner's sugar. (If you have a mixer, you can use it by pulsing the ingredients together for no longer than 30 seconds).
2. Sift the flour into the mix.
3. Beat the eggs whites, gradually adding the granulated sugar until stiff.
4. Pour the almond meal mixture into the egg whites and blend delicately with a spatula.
5. Grease a piece of parchment paper and line your baking pan with it.
6. Spread the batter on a piece of parchment paper to an area slightly larger than your desired shape (circle, long strip etc...) and to a height of 1/3 inches (8mm).
7. Bake at 350°F (180°C) for approximately 15 minutes (depends on your oven), until golden.
8. Let cool and cut to the desired shape.

Variations on the Almond Dacquoise listed above:

Hazelnut Dacquoise
Substitute the same amount of hazelnut meal for the almond meal.

Chocolate Dacquoise
Add 3 tablespoons of sifted unsweetened cocoa powder into the almond meal/caster sugar mix in Step #1 of the Almond Dacquoise.

Lemon Dacquoise
Add the zest of 1 Lemon after the flour in Step #2 of the Almond Dacquoise.

Coconut Dacquoise
Substitute ¼ cup of almond meal and add 2/3 cup shredded coconut in Step #1 of the Almond Dacquoise.


Element #2 Dark Chocolate Mousse

Preparation time: 20mn

Equipment: stand or hand mixer with whisk attachment, thermometer, double boiler or equivalent, spatula

Note: You will see that a Pate a Bombe is mentioned in this recipe. A Pate a Bombe is a term used for egg yolks beaten with a sugar syrup, then aerated. It is the base used for many mousse and buttercream recipes. It makes mousses and buttercreams more stable, particularly if they are to be frozen, so that they do not melt as quickly or collapse under the weight of heavier items such as the crème brulee insert.
In the Vanilla Mousse variation, pastry cream is made to the same effect.
In the Mango Mousse variation, Italian meringue is made to the same effect. Italian meringue is a simple syrup added to egg whites as they are beaten until stiff. It has the same consistency as Swiss meringue (thick and glossy) which we have used before in challenge recipes as a base for buttercream.
The Whipped Cream option contains no gelatin, so beware of how fast it may melt.
Gelatin is the gelifying agent in all of the following recipes, but if you would like to use agar-agar, here are the equivalencies: 8g powdered gelatin = 1 (0.25 oz) envelope powdered gelatin = 1 Tbsp powdered gelatin = 1 Tbsp Agar-Agar.
1 Tbsp. of agar-agar flakes is equal to 1 tsp. of agar-agar powder.

My Note: I should have made the milk choclate mousse in mine...the dark chocolate came out to bitter with the rest of the layers I chose. Also, a little clarification on the gelatin softening would have been nice. My packet had no instructions so I just threw in some cold water. I have no idea if it would make a difference. What ever you do, do not chill this in the fridge after you make it. Lesson learned.


Ingredients:

2.5 sheets gelatin or 5g / 1 + 1/4 tsp powdered gelatin
1.5 oz (3 Tbsp / 40g) granulated sugar
1 ½ tsp (10g) glucose or thick corn syrup
0.5 oz (15g) water
50g egg yolks (about 3 medium)
6.2 oz (175g) dark chocolate, coarsely chopped
1.5 cups (350g) heavy cream (35% fat content)

1. Soften the gelatin in cold water. (If using powdered gelatin, follow the directions on the package.)
2. Make a Pate a Bombe: Beat the egg yolks until very light in colour (approximately 5 minutes until almost white).
2a. Cook the sugar, glucose syrup and water on medium heat for approximately 3 minutes (if you have a candy thermometer, the mixture should reach 244°F (118°C). If you do not have a candy thermometer, test the sugar temperature by dipping the tip of a knife into the syrup then into a bowl of ice water, if it forms a soft ball in the water then you have reached the correct temperature.
2b. Add the sugar syrup to the beaten yolks carefully by pouring it into the mixture in a thin stream while continuing to beat the yolks. You can do this by hand but it’s easier to do this with an electric mixer.
2c. Continue beating until cool (approximately 5 minutes). The batter should become thick and foamy.
3. In a double boiler or equivalent, heat 2 tablespoons (30g) of cream to boiling. Add the chopped chocolate and stir until melted and smooth.
4. Whip the remainder of the cream until stiff.
5. Pour the melted chocolate over the softened gelatin, mixing well. Let the gelatin and chocolate cool slightly and then stir in ½ cup (100g) of WHIPPED cream to temper. Add the Pate a Bombe.
6. Add in the rest of the WHIPPED cream (220g) mixing gently with a spatula.

Variations on the Dark Chocolate Mousse listed above:

White Chocolate Mousse
Substitute the same quantity of white chocolate for the dark chocolate in the mousse recipe listed above.

Milk Chocolate Whipped Cream (Chantilly):
(Can be made the day before and kept in the fridge overnight)
2/3 cup (160g) heavy cream 35% fat
7.8 oz (220g) milk chocolate
2 1/3 tsp (15g) glucose or thick corn syrup
1 1/3 cup (320g) heavy cream 35% fat

1. Chop the chocolate coarsely.
2. Heat the 160g of cream to boiling and pour over the chocolate and glucose syrup.
3. Wait 30 seconds then stir the mix until smooth. Add the remaining cream.
4. Refrigerate to cool, then whip up.


Vanilla Mousse
2/3 cup (160g) heavy cream (35% fat content)
2/3 cup (160g) whole milk
1 vanilla bean
4 medium-sized egg yolks
3 oz (6 Tbsp / 80g) granulated sugar
3 Tbsp (25g) cornstarch, sifted
4g / 2 tsp powdered gelatin or 2 sheets gelatin
1 cup (240g) whipping cream (35% fat content)

Make a pastry cream:
1. Pour the milk and 2/3 cup cream into a saucepan. Split the vanilla bean in half, scrape the seeds from the vanilla bean halves into milk and put the vanilla bean in as well.
2. Heat to boiling, then turn the heat off, cover and let infuse for at least 30 minutes. Then remove the vanilla bean.
3. Beat the egg yolks with the sugar until white, thick and fluffy.
4. Add the cornstarch, beating carefully to ensure that there are no lumps. While whisking vigorously, pour some of the milk into the yolk mixture to temper it.
5. Put infused milk back on the stove on medium heat. Pour yolk mixture back into the milk while whisking vigorously. Keep whisking vigorously until mixture thickens considerably.
6. As soon as the mixture starts to boil, leave on for only 2 more minutes. (The recipe says you should remove the vanilla bean at this time but in the interest of no one getting burned, that can be done after you take the pastry cream off the stove.)
7. Once removed from the heat, cover the pastry cream by putting plastic film directly on the surface of the cream (this prevents it from forming a thick and unappetizing skin as it cools). Let cool at room temperature.
8. Soften the gelatin in cold water and melt in a small saucepan with 1 tsp of water OR melt in the microwave for 1 second (do not boil). Whisking vigorously, pour the cooled pastry cream over it.
9. Whip the 1 cup whipping cream until stiff and add gradually to the pastry cream (DO NOT WHISK). Blend delicately with a spatula (DO NOT WHISK).


Mango Mousse
2 medium-sized egg yolks
2 Tbsp (17g) cornstarch
1/3 cup (80g) whipping cream
7 oz (200g) mango puree
3.5 oz (1/2 cup / 100g) granulated sugar
1.3 oz (36g) water
2.5 gelatin leaves or 5g / 2+1/4 tsp powdered gelatin
3.5oz (100g / ~100ml) about 3 medium-sized egg whites

1. Beat the egg yolks with the cornstarch until thick, white and fluffy.
2. Heat the cream in a medium saucepan and once hot, pour a small amount over the egg yolks while whisking vigorously.
3. Pour the egg yolk mixture back into the rest of the cream in the saucepan, add the mango puree and cook, stirring constantly, until it thickens considerably, at least 3-5 mn. Let cool to lukewarm temperature.
4. Make an Italian Meringue: Cook the sugar and water on medium heat until temperature reaches 244°F (118°C) when measured with a candy thermometer. If you don’t have a candy thermometer, test the temperature by dipping the tip of a knife into the syrup then into a bowl of ice water. If it forms a soft ball, you’ve reached the proper temperature.
4a. Beat the egg whites until foamy. Pour the sugar syrup into the whites in a thin stream while continuing to whisk vigorously (preferably with a mixer for sufficient speed). Whisk/beat until cool (approximately 5 minutes). The meringue should be thick and glossy.
5. Soften the gelatin in cold water and melt in a small saucepan with 1 tsp of water OR melt in the microwave for 1 second (do not boil).
6. Put the melted gelatin in a mixing bowl and, while whisking vigorously, pour the lukewarm mango cream over the gelatin.
7. Carefully blend the Italian meringue into the mango mixture.


Element #3 Dark Chocolate Ganache Insert

Preparation time: 10mn

Equipment: pan, whisk. If you have plunging mixer (a vertical hand mixer used to make soups and other liquids), it comes in handy.

Note: Because the ganache hardens as it cools, you should make it right before you intend to use it to facilitate piping it onto the log during assembly. Please be careful when caramelizing the sugar and then adding the cream. It may splatter and boil.

My Note: My god this was good. I made the white chocalate version which taste like a caramel. I poured, no piping for me.

Ingredients:
1.75 oz (4 Tbsp / 50g) granulated sugar
4.5oz (2/3 cup – 1 Tbsp/ 135g) heavy cream (35% fat content)
5 oz (135g) dark chocolate, finely chopped
3Tbsp + 1/2tsp (45g) unsalted butter softened

1. Make a caramel: Using the dry method, melt the sugar by spreading it in an even layer in a small saucepan with high sides. Heat over medium-high heat, watching it carefully as the sugar begins to melt. Never stir the mixture. As the sugar starts to melt, swirl the pan occasionally to allow the sugar to melt evenly. Cook to dark amber color (for most of you that means darker than last month’s challenge).
2. While the sugar is melting, heat the cream until boiling. Pour cream into the caramel and stir thoroughly. Be very careful as it may splatter and boil.
3. Pour the hot caramel-milk mixture over the dark chocolate. Wait 30 seconds and stir until smooth.
4. Add the softened butter and whip hard and fast (if you have a plunging mixer use it). The chocolate should be smooth and shiny.

Variations on the Dark Chocolate Ganache Insert listed above:

White Chocolate Ganache Insert
1.75 oz (4 Tbsp / 50g) granulated sugar
5 oz (135g) white chocolate, finely chopped
4.5 oz (2/3 cup – 1 Tbsp / 135g) heavy cream (35% fat content)

1. Make a caramel: Using the dry method, melt the sugar by spreading it in an even layer in a small sauce pan with high sides. Heat over medium-high heat, watching it carefully as the sugar begins to melt. Never stir the mixture. As the sugar starts to melt, swirl the pan occasionally to allow the sugar to melt evenly. Cook to dark amber color (for most of you that means darker than last month’s challenge).
2. While the sugar is melting, heat the cream until boiling. Pour cream into the caramel and stir thoroughly. Be very careful as it may splatter and boil.
3. Pour the hot caramel-milk mixture over the dark chocolate. Wait 30 seconds and stir until smooth.


Dark-Milk Ganache Insert
1.75 oz (4 Tbsp / 50g) granulated sugar
4.5oz (2/3 cup – 1 Tbsp / 135g) heavy cream (35% fat content)
2.7 oz (75g) milk chocolate
3.2 oz (90g) dark chocolate
3Tbsp + 1/2tsp (45g) unsalted butter softened

1. Make a caramel: Using the dry method, melt the sugar by spreading it in an even layer in a small saucepan with high sides. Heat over medium-high heat, watching it carefully as the sugar begins to melt. Never stir the mixture. As the sugar starts to melt, swirl the pan occasionally to allow the sugar to melt evenly. Cook to dark amber color (for most of you that means darker than last month’s challenge).
2. While the sugar is melting, heat the cream until boiling. Pour cream into the caramel and stir thoroughly. Be very careful as it may splatter and boil.
3. Pour the hot caramel-milk mixture over the dark chocolate. Wait 30 seconds and stir until smooth.
4. Add the softened butter and whip hard and fast (if you have a plunging mixer use it). The chocolate should be smooth and shiny.


Cinammon-Milk Ganache Insert
1.75 oz (4 Tbsp / 50g) granulated sugar
4.5oz (2/3 cup – 1 Tbsp / 135g) heavy cream
A pinch of cinnamon
2.7 oz (75g) milk chocolate, finely chopped
3.2 oz (90g) dark chocolate, finely chopped
3Tbsp + 1/2tsp (45g) unsalted butter softened

1. Make a caramel: Using the dry method, melt the sugar by spreading it in an even layer in a small saucepan with high sides. Heat over medium-high heat, watching it carefully as the sugar begins to melt. Never stir the mixture. As the sugar starts to melt, swirl the pan occasionally to allow the sugar to melt evenly. Cook to dark amber color (for most of you that means darker than last month’s challenge).
2. Heat the cream with the cinnamon (use the quantity of cinnamon you want to infuse the cream, a pinch is the smallest amount suggested) until boiling. Pour cream into the caramel and stir thoroughly. Be very careful as it may splatter and boil.
3. Pour the hot caramel-milk mixture over the milk and dark chocolate. Wait 30 seconds and stir until smooth.
4. Add the softened butter and whip hard and fast (if you have a plunging mixer use it). The chocolate should be smooth and shiny.


Element #4 Praline Feuillete (Crisp) Insert

Preparation time: 10 mn (+ optional 15mn if you make lace crepes)

Equipment: Small saucepan, baking sheet (if you make lace crepes).
Double boiler (or one small saucepan in another), wax paper, rolling pin (or I use an empty bottle of olive oil).

Note: Feuillete means layered (as in with leaves) so a Praline Feuillete is a Praline version of a delicate crisp. There are non-praline variations below. The crunch in this crisp comes from an ingredient which is called gavottes in French. Gavottes are lace-thin crepes. To our knowledge they are not available outside of France, so you have the option of making your own using the recipe below or you can simply substitute rice krispies or corn flakes or Special K for them. Special note: If you use one of the substitutes for the gavottes, you should halve the quantity stated, as in use 1oz of any of these cereals instead of 2.1oz.
If you want to make your own praline, please refer back to the Daring Baker Challenge Recipe from July 2008.

My Note: There was a pic for this step but it really looked like bear poo on a platter. I made the praline insert with no praline (hard thing to come by in Baker City and I couldn't see spending money on something that I was only going to use once soooo I used some almond meal instead). It worked well until I realized that I used 2 oz. of corn flakes instead of 1 oz. Oopsie. I made the Chocolate Crisp Insert.

To make 2.1oz / 60g of gavottes (lace crepes - recipe by Ferich Mounia):
1/3 cup (80ml) whole milk
2/3 Tbsp (8g) unsalted butter
1/3 cup – 2tsp (35g) all-purpose flour
1 Tbsp / 0.5 oz (15g) beaten egg
1 tsp (3.5g) granulated sugar
½ tsp vegetable oil
1. Heat the milk and butter together until butter is completely melted. Remove from the heat.
2. Sift flour into milk-butter mixture while beating, add egg and granulated sugar. Make sure there are no lumps.
3. Grease a baking sheet and spread batter thinly over it.
4. Bake at 430°F (220°C) for a few minutes until the crepe is golden and crispy. Let cool.

Ingredients for the Praline Feuillete:
3.5 oz (100g) milk chocolate
1 2/3 Tbsp (25g) butter
2 Tbsp (1 oz / 30g) praline
2.1oz (60g) lace crepes(gavottes) or rice krispies or corn flakes or Special K

1. Melt the chocolate and butter in a double boiler.
2. Add the praline and the coarsely crushed lace crepes. Mix quickly to thoroughly coat with the chocolate.
3. Spread between two sheets of wax paper to a size slightly larger than your desired shape. Refrigerate until hard.


Variations on the Praline Feuillete (Crisp) Insert listed above:

Chocolate Crisp Insert
3.5 oz (100g) milk chocolate
1 2/3 Tbsp (25g) unsalted butter
2 Tbsp (1 oz / 30g) praline
1 oz. (25g) lace crepes or rice krispies or corn flakes or Special K

1. Melt the chocolate and butter in a double boiler.
2. Add the praline and the coarsely crushed lace crepes. Mix quickly to thoroughly coat with the chocolate.
3. Spread between two sheets of wax paper to a size slightly larger than your desired shape. Refrigerate until hard.


Coconut Crisp Insert
3.5 oz (100g) white chocolate
1 oz (1/3 cup/25g) shredded coconut
1 2/3 Tbsp (25g) unsalted butter
2.1 oz (60g) lace crepes or rice krispies or corn flakes or Special K

1. Spread the coconut on a baking tray and bake for 5-10 minutes at 375°F (190°C) to toast (a different temperature might work better for you with your own oven).
2. Melt the white chocolate and butter in a double boiler. Stir until smooth and add the toasted coconut.
3. Add the coarsely crushed lace crepes. Mix quickly to thoroughly coat with the chocolate. Spread between two sheets of wax paper to a size slightly larger than your desired shape. Refrigerate until hard.


Element #5 Vanilla Crème Brulée Insert

Preparation time: 15mn + 1h infusing + 1h baking

Equipment: Small saucepan, mixing bowl, baking mold, wax paper

Note: The vanilla crème brulée can be flavored differently by simply replacing the vanilla with something else e.g. cardamom, lavender, etc...

Ingredients:
1/2 cup (115g) heavy cream (35% fat content)
½ cup (115g) whole milk
4 medium-sized (72g) egg yolks
0.75 oz (2 Tbsp / 25g) granulated sugar
1 vanilla bean

1. Heat the milk, cream, and scraped vanilla bean to just boiling. Remove from the stove and let the vanilla infuse for about 1 hour.
2. Whisk together the sugar and egg yolks (but do not beat until white).
3. Pour the vanilla-infused milk over the sugar/yolk mixture. Mix well.
4. Wipe with a very wet cloth and then cover your baking mold (whatever shape is going to fit on the inside of your Yule log/cake) with parchment paper. Pour the cream into the mold and bake at 210°F (100°C) for about 1 hour or until firm on the edges and slightly wobbly in the center.
Tartelette says: You can bake it without a water bath since it is going to go inside the log (the aesthetics of it won't matter as much since it will be covered with other things)....BUT I would recommend a water bath for the following reasons:
- you will get a much nicer mouth feel when it is done
- you will be able to control its baking point and desired consistency much better
- it bakes for such a long time that I fear it will get overdone without a water bath
Now...since it is baked in a pan and it is sometimes difficult to find another large pan to set it in for a water bath, even a small amount of water in your water bath will help the heat be distributed evenly in the baking process. Even as little as 1 inch will help.
5. Let cool and put in the freezer for at least 1 hour to firm up and facilitate the final assembly.

Variations on the Vanilla Crème Brulée insert listed above:

Chocolate Creme Brulée Insert
½ cup + 1 2/3 Tbsp (140g) whole milk
2/3 cup + 1tsp (140g) heavy cream (35% fat content)
1/3 cup (25g) unsweetened cocoa powder
4 medium-sized (72g) egg yolks
1.4 oz (3 Tbsp / 40g) granulated sugar

1. Heat the milk and cream to just boiling. Add the cocoa powder.
2. Whisk together the sugar and egg yolks (but do not beat until white).
3. Pour the cocoa milk over the sugar/yolk mixture. Mix well.
4. Wipe with a very wet cloth and then cover your baking mold (whatever shape is going to fit on the inside of your Yule log/cake) with parchment paper. Pour the cream into the mold and bake at 210°F (100°C) for about 1 hour or until firm on the edges and slightly wobbly in the center.
Tartelette says: You can bake it without a water bath since it is going to go inside the log (the aesthetics of it won't matter as much since it will be covered with other things)....BUT I would recommend a water bath for the following reasons:
- you will get a much nicer mouth feel when it is done
- you will be able to control its baking point and desired consistency much better
- it bakes for such a long time that I fear it will get overdone without a water bath
Now...since it is baked in a pan and it is sometimes difficult to find another large pan to set it in for a water bath, even a small amount of water in your water bath will help the heat be distributed evenly in the baking process. Even as little as 1 inch will help.
5. Let cool and put in the freezer for at least 1 hour to firm up and facilitate the final assembly.


Element #6 Dark Chocolate Icing

Preparation time: 25 minutes (10mn if you don’t count softening the gelatin)

Equipment: Small bowl, small saucepan

Note: Because the icing gelifies quickly, you should make it at the last minute.
For other gelatin equivalencies or gelatin to agar-agar equivalencies, look at the notes for the mousse component.

My Note: Once again, I think exact gelatin softening instructions might make a difference here. This came out a little rubbery...good but rubbery. I was told that Loran's dad ate it for breakfast for the next three days after we gave it to him. Must not have been too bad.
Ingredients:
4g / ½ Tbsp powdered gelatin or 2 sheets gelatin
¼ cup (60g) heavy cream (35 % fat content)
2.1 oz (5 Tbsp / 60g) granulated sugar
¼ cup (50g) water
1/3 cup (30g) unsweetened cocoa powder

1. Soften the gelatin in cold water for 15 minutes.
2. Boil the rest of the ingredients and cook an additional 3 minutes after boiling.
3. Add gelatin to the chocolate mixture. Mix well.
4. Let cool while checking the texture regularly. As soon as the mixture is smooth and coats a spoon well (it is starting to gelify), use immediately.

Variations on the Dark Chocolate Icing listed above:

Milk Chocolate Icing
1.5 gelatin sheets or 3g / 1/2Tbsp powdered gelatin
4.2 oz (120g) milk chocolate
2 Tbsp (30g) butter
¼ cup (60g) heavy cream (35 % fat content)
1 2/3 Tbsp (30g) glucose or thick corn syrup

1. Soften the gelatin in cold water for 15 minutes.
2. Coarsely chop the chocolate and butter together.
3. Bring the cream and glucose syrup to a boil.
4. Add the gelatin.
5. Pour the mixture over the chocolate and butter. Whisk until smooth.
6. Let cool while checking the texture regularly. As soon as the mixture is smooth and coats a spoon well (it is starting to gelify), use immediately.


White Chocolate Icing
1.5 gelatin sheets or 3g / 1/2Tbsp powdered gelatin
3.5 oz (100g) white chocolate
2 Tbsp (30g) unsalted butter
1/3 cup (90 g) whole milk
1 2/3 Tbsp (30g) glucose or thick corn syrup

1. Soften the gelatin in cold water for 15 minutes.
2. Coarsely chop the chocolate and butter together.
3. Bring the milk and glucose syrup to a boil.
4. Add the gelatin.
5. Pour the mixture over the chocolate and butter. Whisk until smooth.
6. Let cool while checking the texture regularly. As soon as the mixture is smooth and coats a spoon well (it is starting to gelify), use immediately.


How To Assemble your French Yule Log

Depending on whether your mold is going to hold the assembly upside down until you unmold it or right side up, this order will be different.
THIS IS FOR UNMOLDING FROM UPSIDE DOWN TO RIGHT SIDE UP.
You will want to tap your mold gently on the countertop after each time you pipe mousse in to get rid of any air bubbles.


1) Line your mold or pan, whatever its shape, with rhodoid (clear hard plastic, I usually use transparencies cut to the desired shape, it’s easier to find than cellulose acetate which is what rhodoid translates to in English) OR plastic film. Rhodoid will give you a smoother shape but you may have a hard time using it depending on the kind of mold you’re using.

You have two choices for Step 2, you can either have Dacquoise on the top and bottom of your log as in version A or you can have Dacquoise simply on the bottom of your log as in version B:

2A) Cut the Dacquoise into a shape fitting your mold and set it in there. If you are using an actual Yule mold which is in the shape of a half-pipe, you want the Dacquoise to cover the entire half-pipe portion of the mold.
3A) Pipe one third of the Mousse component on the Dacquoise.
4A) Take the Creme Brulee Insert out of the freezer at the last minute and set on top of the mousse. Press down gently to slightly ensconce it in the mousse.
5A) Pipe second third of the Mousse component around and on top of the Creme Brulee Insert.
6A) Cut the Praline/Crisp Insert to a size slightly smaller than your mold so that it can be surrounded by mousse. Lay it on top of the mousse you just piped into the mold.
7A) Pipe the last third of the Mousse component on top of the Praline Insert.
8A) Freeze for a few hours to set. Take out of the freezer.
9A) Pipe the Ganache Insert onto the frozen mousse leaving a slight eidge so that ganache doesn’t seep out when you set the Dacquoise on top.
10A) Close with the last strip of Dacquoise.
Freeze until the next day.

OR

2B) Pipe one third of the Mousse component into the mold.
3B) Take the Creme Brulee Insert out of the freezer at the last minute and set on top of the mousse. Press down gently to slightly ensconce it in the mousse.
4B) Pipe second third of the Mousse component around and on top of the Creme Brulee Insert.
5B) Cut the Praline/Crisp Insert to a size slightly smaller than your mold so that it can be surrounded by mousse. Lay it on top of the mousse you just piped into the mold.
6B) Pipe the last third of the Mousse component on top of the Praline Insert.
7B) Freeze for a few hours to set. Take out of the freezer.
8B) Pipe the Ganache Insert onto the frozen mousse leaving a slight edge so that ganache doesn’t seep out when you set the Dacquoise on top.
9B) Close with the Dacquoise.
Freeze until the next day.

If you are doing the assembly UPSIDE DOWN with TWO pieces of Dacquoise the order is:
1) Dacquoise
2) Mousse
3) Creme Brulee Insert
4) Mousse
5) Praline/Crisp Insert
6) Mousse
7) Ganache Insert
8) Dacquoise

If you are doing the assembly UPSIDE DOWN with ONE piece of Dacquoise on the BOTTOM ONLY the order is:
1) Mousse
2) Creme Brulee Insert
3) Mousse
4) Praline/Crisp Insert
5) Mousse
6) Ganache Insert
7) Dacquoise

If you are doing the assembly RIGHT SIDE UP in a springform pan the order is:
1) Dacquoise
2) Ganache Insert
3) Mousse
4) Praline/Crisp Insert
5) Mousse
6) Creme Brulee Insert
7) Mousse
8 OPTIONAL) Dacquoise

THE NEXT DAY...
Unmold the cake/log/whatever and set on a wire rack over a shallow pan.
Cover the cake with the icing.
Let set. Return to the freezer.
You may decorate your cake however you wish. The decorations can be set in the icing after it sets but before you return the cake to the freezer or you may attach them on top using extra ganache or leftover mousse, etc...
Transfer to the refrigerator no longer than ½ hour before serving as it may start to melt quickly depending on the elements you chose.


This month's challenge is brought to us by the adventurous Hilda from Saffron and Blueberry and Marion from Il en Faut Peu Pour Etre Heureux.
They have chosen a French Yule Log by Flore from Florilege Gourmand